Contents
Excel
Export with more details
Synopsis
This document describes how you can use the power of Reporting in TraceCloud to quickly filter and find your data and how you can make bulk changes. Please note that TraceCloud gives you a rich reporting platform and there are multiple ways to get to your data. I.e. Dashboards (Project, Release, Baseline, User, and Folder) that are sets are canned reports generated every night, List Reports, TraceTree reports and Word Reports. This document covers List Reports.
Use Case
List Report is a very simple report using which you can list all the Requirements and their attributes in folder.
· You can apply filtering criteria on this list (eg : Show me only requirements with ‘xxx’ in the name, or requirements that are dangling or have suspect traces or whose custom attribute is ‘xyz’).
· Any operation you can do to a Requirement in the ‘Requirement Display’ screen, you should be able to do in bulk using the List Report’s bulk edit feature. Eg:
o You can select a bunch of Requirements and delete, purge, move, copy, approve, reject, change values in one step
o You can select a bunch of Requirements and trace them or clear traces or do other operations in one step.
· You can export this Report in to an Excel, Word, PDF file
· You can email this Report
· You can get a URL to this report and book mark it
· You can save a snapshot of this report in to TDCS (TraceCloud Document Control System) for permanent easy reference.
Concept
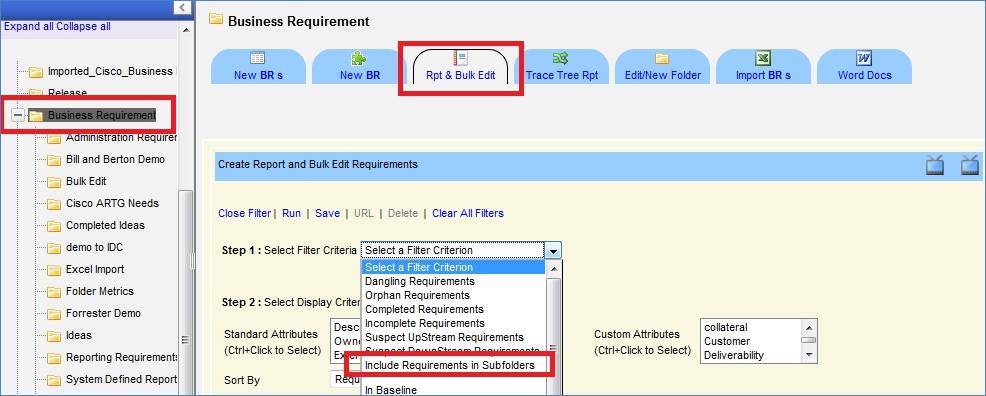
In TraceCloud every Requirement Type has a corresponding root level folder. For example, if you have a requirement type called ‘Business Requirements’, then you will see a folder called ‘Business Requirements’, and any Business Requirement you create in this project can exist only in this folder or in a subfolder within this folder.
So, if you want to report on Business Requirements, simply click on this folder and click on ‘Rpt & Bulk Edit’ tab. From here , by selecting the ‘Include Requirements in Sub folders’ filter, you can report on ANY and ALL Business Requirements in the project (Similarly for all other Requirement Types).
Create A Report
As shown in the image above, depending on what you want to report on, you select the appropriate folder in the explorer, and click on ‘Rpt & Bulk Edit’ tab. By choosing the filter ‘Include Requirements in Subfolders’ you can choose to report on all requirements in this folder or in any subfolder in this folder.
Filter
You can apply multiple filters on your report set. Here are a few tips.
· If you apply no filter at all, you will get all the requirements in this folder.
· If you apply more than one filter, the result set will narrow down to only those requirements that fit every one of the filter conditions
· If the filter is of the type ‘Drop Down’ (Eg : for Priority filter, you can choose High, Medium, Low) and you select more than one option (High and Medium) then all the Requirements whose Priority is either High or Medium or chosen
· You can use ‘Control + Click’ to select / deselect items from a multi select drop down list.
TraceCloud List Report gives the following filters
· Canned
o Dangling : Requirements that do not have a trace coming to them. i.e Business Requirements without a Functional Requirement tracing to it
o Orphan: Requirements that do not trace to a higher requirement. i.e Business Requirements that are not part of any Release
o Completed : Those Requirements whose completed % is set to 100%
o Incomplete : Those Requirements whose completed % is set to less than 100%
o Suspect Upstream: Those Requirements that trace to a higher requirement, but this trace relationship is suspect. i.e. there is some unacknowledged change upstream
o Suspect Downstream: Those Requirements that have a trace from a lower requirement, but this trace relationship is suspect. i.e. there is some unacknowledged change downstream
o Include Requirements in Subfolders: Report on all Requirements in this Folder or in any subfolder below this folder.
· In Baseline: If you have defined Baselines and added Requirements to Baselines, then you can select this option to locate all Requirements in a Baseline.
· Changed After Baseline : Choose this option to select all Requirements that have changed after they have been added to a particular Baseline
·
· Name like: enter a string to locate all Requirements that have this string in their name. The search is case insensitive.
· Description like: enter a string to locate all Requirements that have this string in their description. The search is case insensitive.
· Owner email id like: enter an email id (Nathan@tracecloud.com) to locate all requirements owned by this person in this folder.
· External URL like: enter a string to locate all Requirements that have this string in their External URL field. The search is case insensitive.
·
· Percent Complete Less than : Enter a number to locate Requirements whose % complete is less than this
· Approval Status In : Select from one or more values of ‘Draft’, ’In Work Flow’, ‘Approved’ and ‘Rejected’ to get the appropriate requirements
· Priority In : Select from one or more values of ‘High, ’Medium’, and ‘Low’ to get the appropriate requirements
· Testing Status In : Select from one or more values of ‘Pending’ ,’Pass’ and ‘Failed’ to get the appropriate requirements
·
· Approved By, Rejected By, Approval Pending By : In each of these filters enter an email id to select Requirements that are either Approved By, or Pending By or Rejected by this user
· Custom Attribute Filters
o Depending on which Folder (Requirement Type) you are in, the custom attributes can differ
o You will see filters for each of these custom attributes and you can choose to apply them
o If the Custom attribute has been defined as a ‘Drop Down’, you will see a multi select drop down with the possible values prefilled.
o For all other attributes, you can enter a string for a wild card case insensitive search.
Display
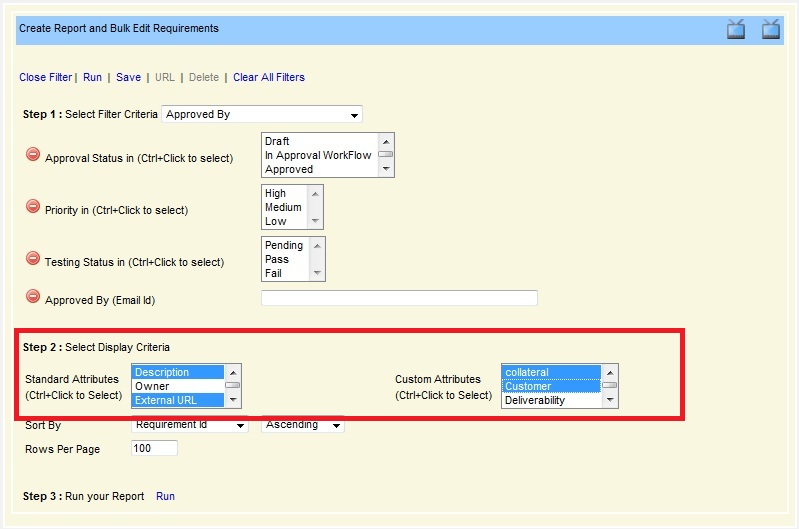
In the image below, you can see how ‘Display’ works
· Choose Display to tell TraceCloud which columns to display in the report
· You can use ‘Control + Click’ to select / deselect columns
· In the Standard Attributes you can choose ‘Description’, ‘Owner’, ‘External URL’, ‘TraceTo’, ‘TraceFrom’, ‘Approved By’, ‘Rejected By’, ‘Pending By’, ‘Approval Status’, ‘Priority’, ‘Percent Complete’, ‘Testing Status’, ‘Folder Path’, ‘Baselines’, ‘Created Dt’ and ‘Attachments’
· In the Custom Attributes, you can choose the ‘Custom Attributes’ for this Requirement Type.
Sort
In the image above, you can see how you can use ‘Sort By’ to sort your output in an ascending or descending order.
Page Size
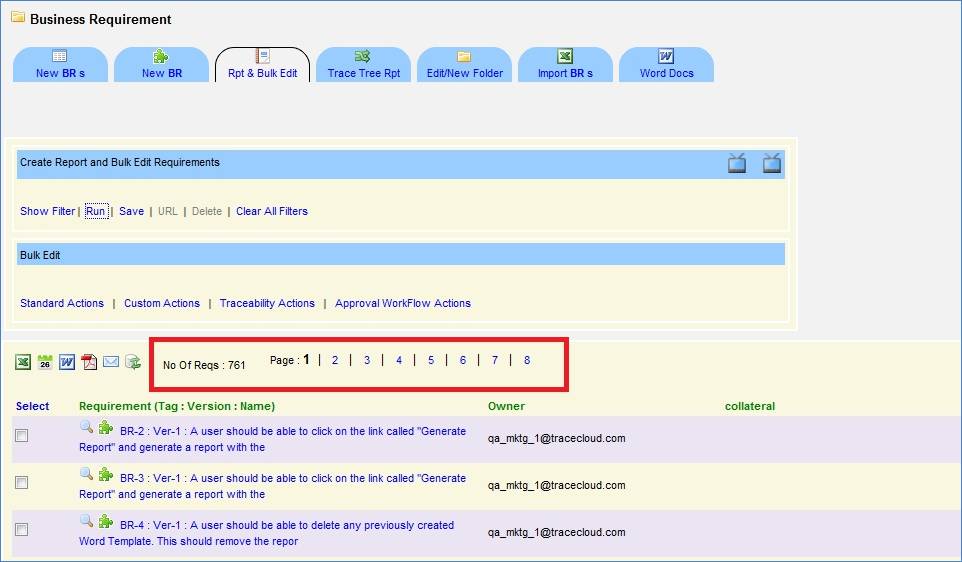
Use the ‘Rows Per Page’ option to set the number of Requirements per page you would like to see. TraceCloud inherently uses a 100 Rows per page and pagination to handle very large outputs. For example in the image below, you can see that the report returned 761 Requirements, however, since the page size was set to 100 Requirements per page , it showed 8 pages.
Note: TraceCloud has a Bulk Edit feature, where you can select Requirements in the List Report to modify them in bulk. If you would like to perform a bulk operation, you may need to increase your page size so that you can perform the same operation on a large number of Requirements. Eg: in the image below, if I wanted to modify all 781 Requirements at the same time, I may choose to set ‘Rows Per Page’ to 781. The caveat here is, if you set this number to very very high (eg: 5000), your browser may slow down.
Save A Report
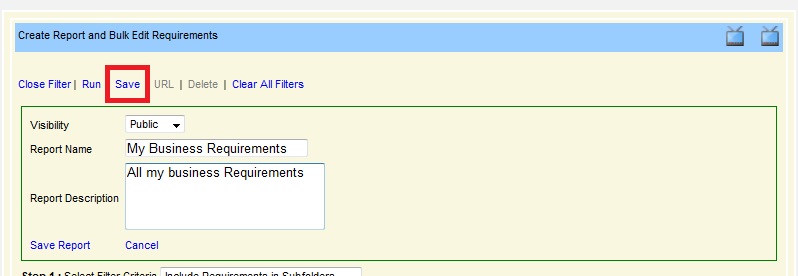
As shown below, you can save a report for future reference. You can choose to save it as ‘Public’ or ‘Private’. Public reports are visible to all users.
For a user to access a Public report the following conditions have to be met:
· The report has to be public
· The user has to have ‘Read’ permissions on the folder where the report is saved
· If the user does not have ‘Read’ permission on the Requirements returned by this report, then the Requirements are redacted. I.e. they show up with N/A in all the fields.
Once you save a report, there are multiple ways to get to it.
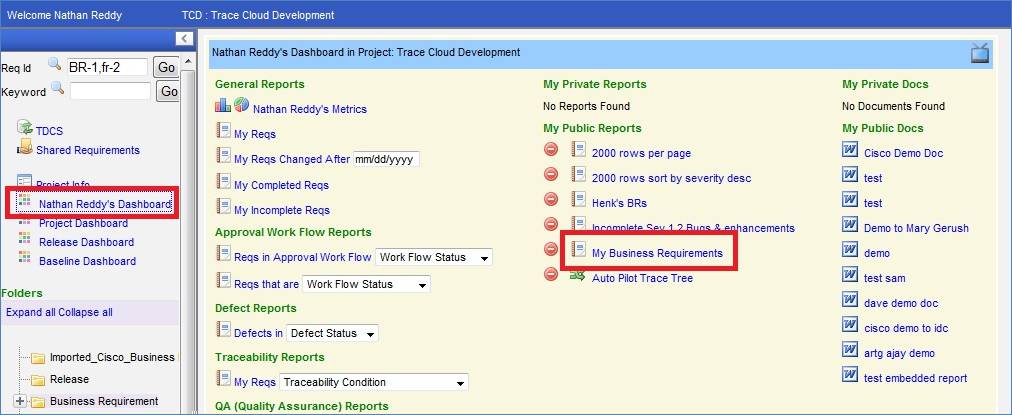
User Dashboard
When you log in to your project or when you click on your personal dashboard, you will see all the reports saved by you in this project. In the image below you can see the ‘My Business Requirements’ report.
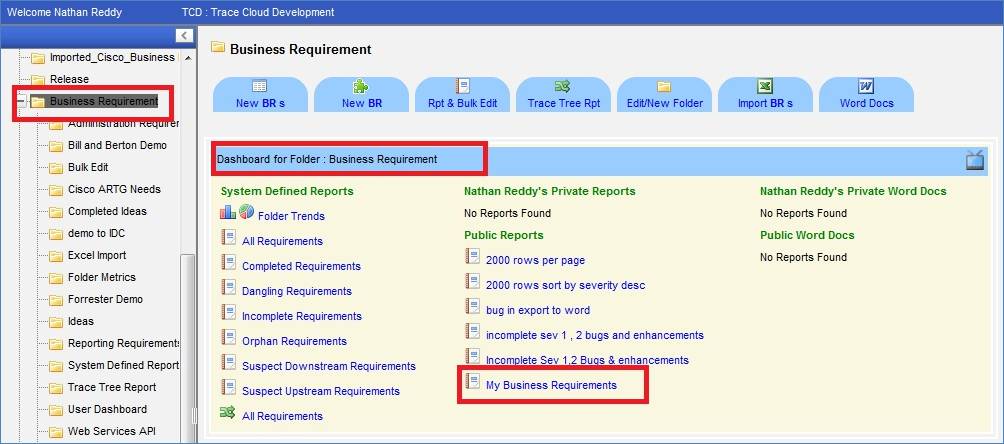
Folder Dashboard
Any time you click on a folder, you are taken to the ‘Folder Dashboard’ and you can see ALL the Public reports saved by ALL users in this folder and Any Private reports saved by you in this folder.
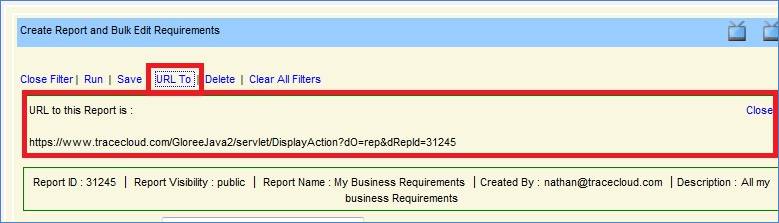
URL to the Report
For any report, you can get a URL and you can bookmark this URL in your browser to quickly run the report.
Embed the Report
You can easily embed a report in a word document and when you regenerate this document, the report is executed and all the requirements are printed in the regenerated document. For more information on this please look at the topic ‘Creating MS Word Reports’ in the TraceCloud documentation.
What can you do with a Report
Once you have applied your filter, display, sort criteria and run your report, you are presented with an output list of Requirements. Apart from looking at this data, at this point you can do a lot of things with this information. This is where TraceCloud’s usability and focus on productivity pays dividends. You can perform bulk operations on this collection of requirements, you can export this data in any of your favorite formats (Excel, PDF, and Word), you can email this report or you can store it in a document control system for future audit reference. We will go into more detail below.
Bulk Edit
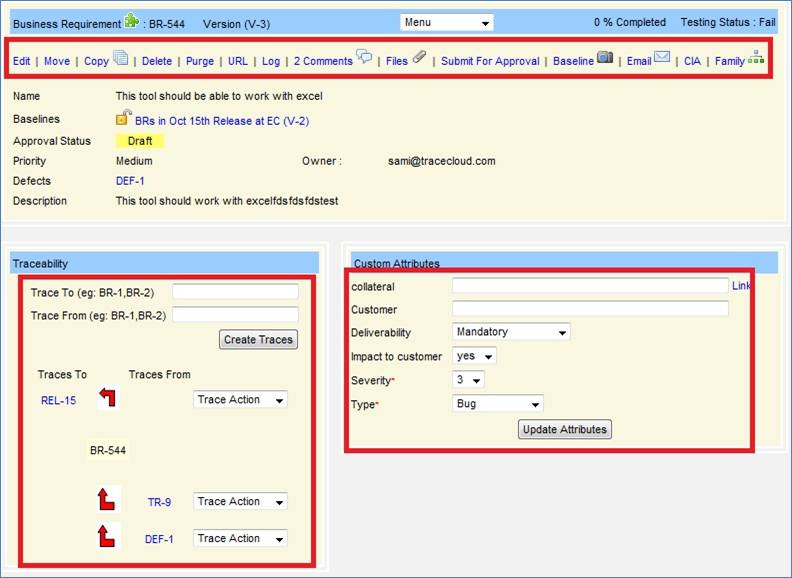
If you can look at a Requirement in TraceCloud you can see a rich set of operations you can perform on it. In the image below, you can Edit, Move, Copy, Delete, Purge, Submit for Approval, Approve / Reject, Add / remove from baselines, email, set / clear / remove traceability or update attributes. The concept behind Bulk Edit is to be able to perform any of these operations on a collection of requirements with ease. These operations are divided into 4 categories i.e. Standard, Custom, Traceability and Approval Workflow.
Standard Actions
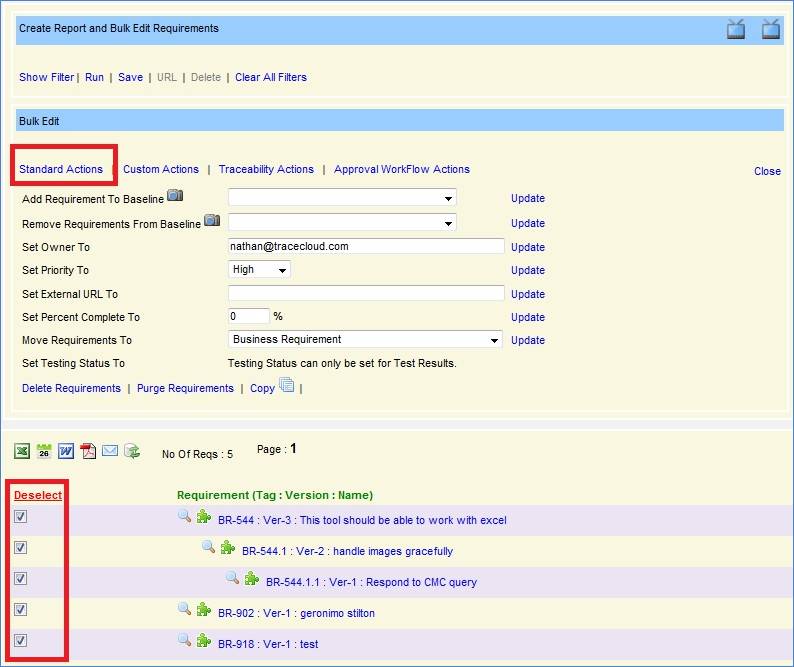
Once you apply your filter criteria and run your report, you get a list of matching Requirements. Select the requirements that you want to edit in bulk and click on Standard Actions to do
· Add Requirements to Baseline (can only be done to Unlocked Baseline)
· Remove Requirements to Baseline (can only be removed from Unlocked Baseline)
· Change Owner
· Change Priority
· Change External URL
· Change Percent Complete
· Move Requirements to a different folder (A Requirement can only be moved into a sub folder that holds Requirements of this type. Eg A ‘Business Requirement’ can only be moved into a sub folder of ‘Business Requirements’)
· Change Testing Status (By design, you can only set the Testing Status of Test Results. All other Requirements get their Testing Status value based on the Testing Status value of all the requirements that roll up to it)
· Delete Requirements (This is a soft delete and can be restored)
· Purge Requirements (This is a hard delete and cannot be restored)
· Copy (This is a powerful feature and enables you to copy Requirements in bulk to any project / requirement type / folder.)
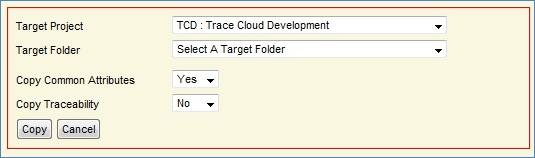
o Use Case 1: Copy all Business Requirements to Test Case folder to create Test Cases.
o Use Case 2 : Copy all Functional Requirements from Project X to Project Y
o Use Case 3: Copy all Test Results from Iteration1 folder to Iteration2 folder, while retaining the traceability and setting the common attributes the same.
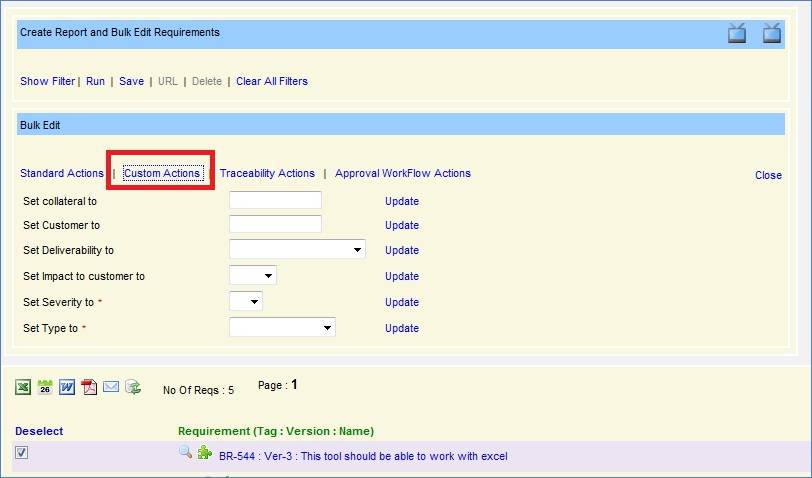
Custom Actions
Custom actions are a way to modify the values of Custom Attributes in bulk. By definition, what Custom actions are available to you depend on which Requirement Type / Folder you are trying to bulk edit.
Traceability Operations
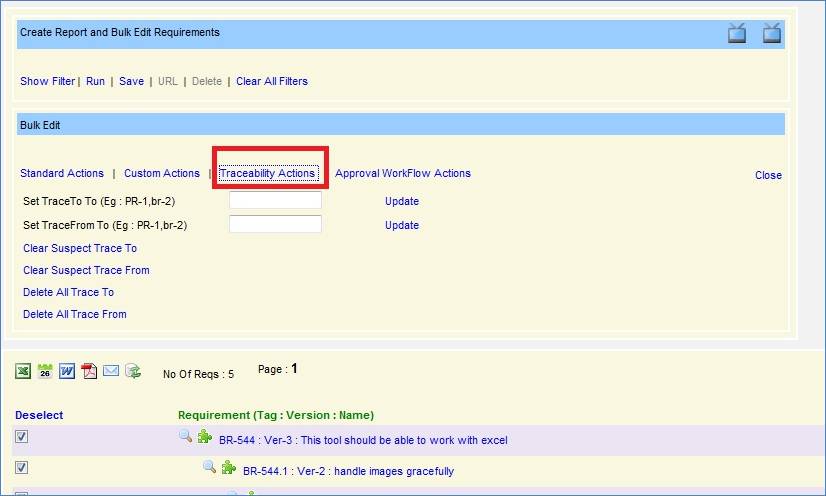
You can perform multiple traceability operations in bulk using the bulk editor. Some of them are …
· Set Trace To (You can list a comma separated list of req ids eg : Br-1,Br-3,BR-3 to trace your selected requirements to)
· Set Trace From (A comma separated list of requirements from which you want to trace to your selected requirements)
· Clear Suspect Trace To (For all the selected requirements, clear all out going suspect traces)
· Clear Suspect Trace From (For all the selected requirements, clear all incoming suspect traces)
· Delete All Trace To (Delete all traces coming to the selected requirements)
· Delete All Trace From (Delete all traces from the selected requirements)
Approval Work Flow Operations
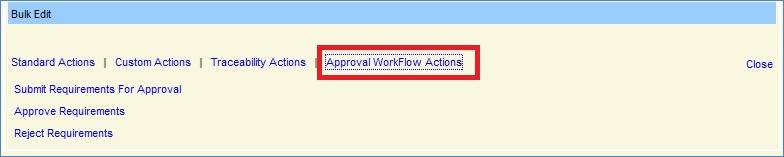
You can select the Requirements in bulk and choose to either ‘Submit them for Approval’, or ‘Approve them’ or ‘Reject them’. Please note that to have these options enabled,
· the Requirement Type should be enabled for approval
· The Requirements should be in the appropriate stage (Draft, in Work Flow etc...)
· The user should have ‘Approve Requirements’ permission on these Requirements.
Export Data
Once you have the report data, you can save this output for future reference. There are multiple ways to save the output of a report
Excel Export

This feature outputs the data in to an Excel file. It leverages the Excel color codes, drop down features and built in validations to ensure that when you modify the information in this excel file, the new information is compatible with the TraceCloud system for an easy upload.
Note: if you plan to modify the data into Excel file, for a re-upload to update Requirements in bulk, please remember to remove the 1st tab. The 1st tab is the cover page of the report and is not required for upload.
Excel Export with more details

This feature is very similar to the ‘Excel Export’ feature. The difference is that it adds two extra tabs to the report. One tab contains the Requirement Version History i.e. it shows a Requirement through all its version changes .Another tab shows the comments made by users on each of these Requirements.
Word Export

In this feature, the report is exported as a MS Word document, where each Requirement is represented as a table. All the columns of information you have chosen to display will appear as an individual row in the table.
PDF Export

This feature is similar to the ‘Word Export’; the only difference is that this is an Adobe Acrobat report.
Email the Report
TraceCloud makes it easy for you to email your reports out to your colleagues. You can apply your filter, display, sort criteria and run your report and by clicking on the ‘Email’ link you can email it out.

TDCS
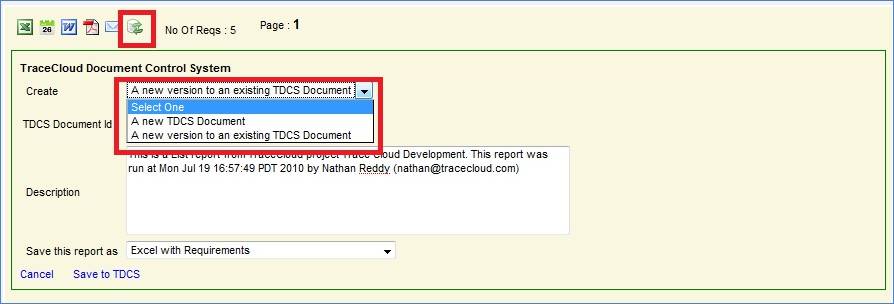
TraceCloud provides a simple yet powerful document control system called TDCS (TraceCloud Document Control System). The benefit of this is that you can take a snapshot of any report at a point in time and store it for posterity. You can choose the output format of your report (Excel, Excel with comments / revisions, MS Word or PDF) and you can choose to either make a new TDCS document or add this snapshot as a new version of an existing TDCS document.
To add as a new version to an existing TDCS document, the document should be in an unlocked state and you must have Write permissions on that document. TDCS documents cannot be deleted by users, so they will exist in perpetuity. When the project administrator decides that the project is no longer required, then all the TDCS documents are removed from the system.
For more information on the TDCS system, please refer to the TDCS documentation Manuel.