Contents
Move
users to a Different Role
Synopsis
This document describes how you can Administer a TraceCloud project
Use Case
Every project has a structure defined by its Requirement Types, Attributes, User Roles and Permissions. At the beginning of your project, as you are defining your process, you will need to modify the structure of your project constantly. As your project matures, you may need to additional roles, and add users to these roles. This document covers the typical tasks covered by a project administrator.
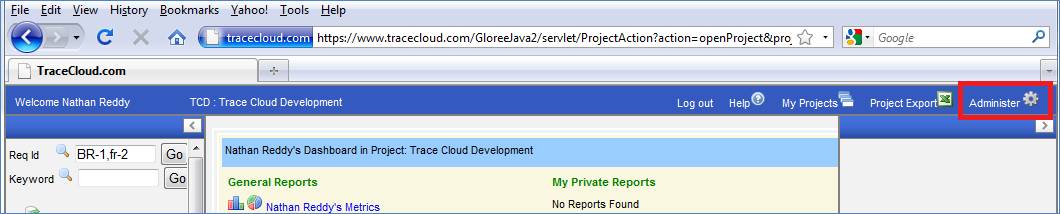
The Administration tool can be launched by clicking the ‘Administer’ link in your Project.
Requirement Types
At the core of every Project are a collection of Requirement Types. If you observe your projects, you will notice that they are a collection of Business / Product Requirements (given by your Marketing / Product Mgmt teams), and a Functional / Design Requirements (given by the Design / Architecture / Engineering teams) , Test Plans (given by testing teams) and Test Results (the outcome of testing). Depending on your process, you may call them by different names, but the underlying concept is the same. I.e. Multiple teams / user groups are working on this project, and each group has a collection of needs and the next team in the pipeline works to fulfill them.
TraceCloud follows a similar model, and give you complete flexibility in defining and managing your project .
Create a Requirement Type
Notes :
· Prefix : All the requirements of this type will get their Tags (unique numbers for requirement id) starting with this Prefix. For example, you may want all your ‘Business Requirements’ to be called BR-1, BR-2, and BR-3. In this case your prefix would be BR.
· Once you set a Prefix for a Requirement Type, you cannot change it.
· Every Requirement Type has the built in ability to support ‘Approval Work Flow’. If this is enabled then
o Every time a Requirement is modified and its version number changes, its ‘Approval status’ is set to ‘Draft’
o It can be submitted for ‘Approval’
o All the users with Roles that have for ‘Approval’ privileges on this Requirement will be notified that its pending their approval
o If any one of the Rejects this requirement, then it’s status goes to ‘Rejected’
o If everyone approves it, then it becomes ‘Approved’
· It makes sense for some Requirement Types to have an ‘Approval Work Flow’ enabled (eg : Business Requirements, Functional Requirements) and not other (Eg : Release , Test Results etc..)
· Every Requirement Type gets a correspondingly named Root level Folder. For example, if you have Requirement Type called ‘Business Requirements’, then a folder called ‘Business Requirements’ will be automatically created in the project
· All ‘Business Requirements’ will reside in this folder, or a sub folder underneath this root level folder
· Display Sequence Number: This is a number that determines the order the Root Level folders appear in your Project. If you want your folders to appear as Release, Business Req, Functional Req, then give these Req Types ‘Display Sequence Numbers’ like 1 , 2, 3.
· Can be reported as Orphan :
o Any Requirement that does not TraceTo (TraceUp) to another Requirement is called an ‘Orphan’ requirement. I.e. there is no higher level Requirement driving this. Eg : Your process dictates that all your Business Requirements must be part of a Release, then if you have any Business Requirements that are not tracing to a Release then they are called ‘Orphan’ business Requirements
o Depending on your process, there will always be some requirements that are ‘Orphan’. EG : if your process is like REL ßBR ß FS ß Test Case , then your REL req type are Orphan by definition
o If you don’t want the dashboard and reports to mark your ‘REL’ requirements are Orphans, then you set the ‘can be reported as Orphan’ flag to ‘No’
· Can be reported as Dangling :
o Any Requirement that does not have a Trace from (Trace Down) another Requirement is called a ‘Dangling requirement. I.e. there is no lower level Requirement that is implementing this. Eg : Your process dictates that all your Business Requirements must have Functional Requirements, then if you have any Business Requirements that do not have a Trace from any other Requirement in the system then they are called ‘Dangling’ Business Requirements
o Depending on your process, there will always be some requirements that are ‘Dangling. EG : if your process is like REL ßBR ß FS ß Test CaseßTest Results , then your Test Result req type are Dangling by definition
o If you don’t want the dashboard and reports to mark your ‘Test Results requirements are ‘Dangling’, then you set the ‘can be reported as Dangling flag to ‘No’

Edit a Requirement Type
To Edit a Requirement Type, log into your project, click on ‘Administer’ link in your Project. Once you get to the ‘Project Administration Tool’ all your Requirement Types are listed in the left hand side. Click on any one of them, and then click on ‘Edit Req Type’ link.
Notes :
· You cannot change the Prefix of a Requirement Type after a Requirement Type has been created. (The work around is to create a new Req Type).
· Other than, you can modify the Approval Workflow, Display sequence, can be reported as Orphan / Dangling , Name and Description.
· Requirement Type Edit screen is also the place to Add / Remove / Modify Baselines and Custom Attributes of a Requirement Type. More on this topic later in this document.

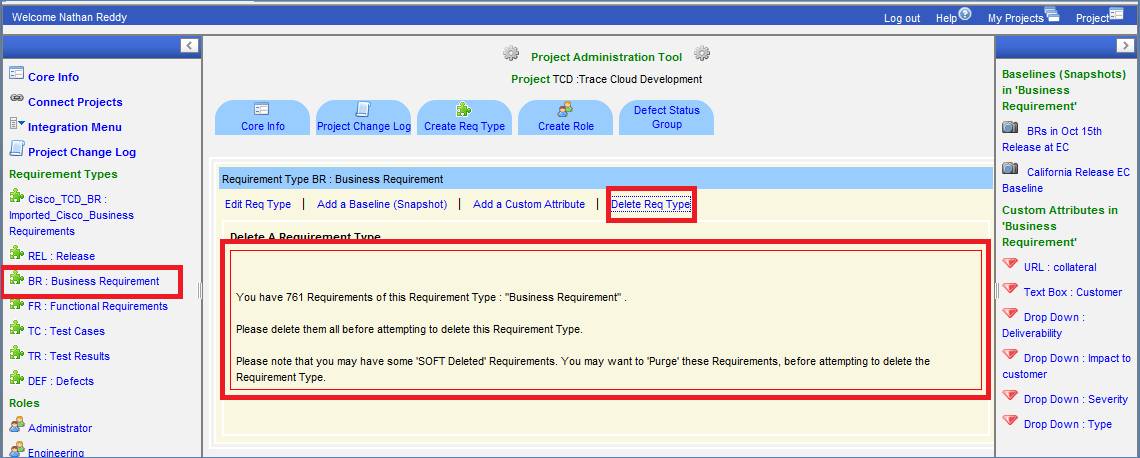
Delete a Requirement Type
To Delete a Requriement Type,
go to the ‘Project Administration Tool’, select the Requirement Type, and click
the ‘Delete Req Type’ link .
Notes :
·
You can not
delete a Req types, if the project still has some Requirements of this type
·
Hint : You might have
‘deleted’ and not ‘purged’ some Requirements. So , please go to the ‘Deleted
Requirements’ Folder in the project, select this Requriement Type and choose
‘Purge All’ option to permanently remove all your Requirements, before
attempting ‘Delete Requirement Type’.
Custom Attribute
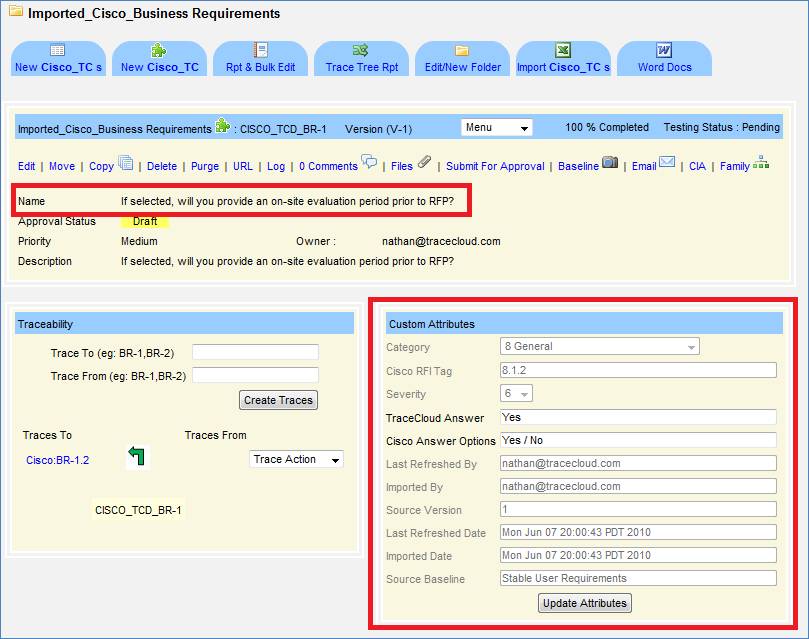
For any Requirement Type, you may want to track more information than just the text of the Requirement itself. This collateral changes depending on your process and Requirement Type. For example, for some firms it’s important to track who captured a Business Requirement, Which Client Requested it, what date it was promised for delivery, Which Release it is part of , Expected Cost of Delivery etc… Similarly, For a Functional Spec, you may want to track some engineering / product specific parameters. The benefits of capturing this additional information is that you can track and report your Requirements based on these attributes. Here is a screenshot of a Requirement, with its custom attributes.
Create a Custom Attribute
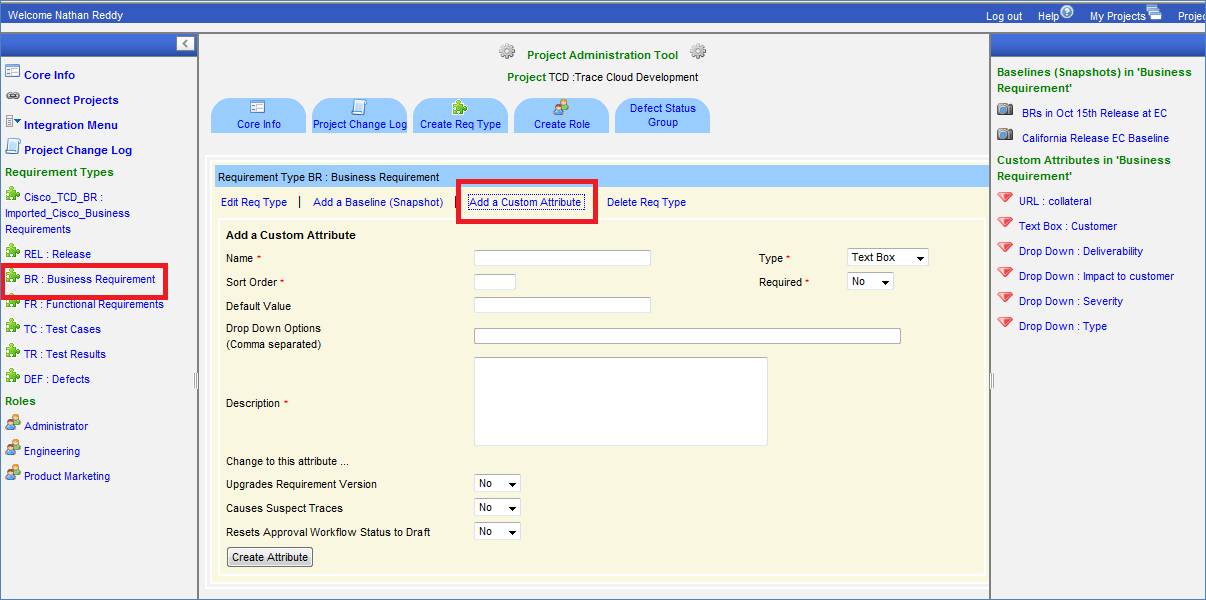
To Create a Custom Attribute, log in to your project, click on ‘Administer’ to get into the Administration tool, Select the Requirement Type you want to add a Custom Attribute to and click on ‘Add a Custom Attribute’.
Note :
· Attribute Name has to be unique. The system will enforce that for you.
· Type
o There are 4 types of custom attributes supported in TraceCloud
o TextBox: It is a box where you can add text. In the above screenshot, ‘TraceCloud Answer’ is a Text box
o DropDown : If you want to limit the user input to a set of predefined values, then you can set this Custom Attribute as a Drop Down. Remember to enter the drop down values as a comma separated list in the ‘Drop Down Options’ box.
o URL : This is similar to Textbox, in that it’s an editable text box. The difference is that the system also displays a clickable URL of the value in this field next to the text box. The business case here is “No Requirement exists in isolation, and there is generally information in other websites that is relevant to this Requirement. Instead of replicating all that again, we want a custom attribute that can link to it”. Another use case is if you want your TraceCloud Requirement to refer to another tool in your organization, and you have a URL to that , you can link your Requirement to that system using this field. Some clients have used this to link their Requirements to their Defect Tracking system.
o Date: Self explanatory. The system ensures that the users can only enter a valid date value in this field.
· Sort Order: Controls the order in which these Attributes are displayed. See the screenshot above.
· Required: If set to ‘Yes’, then a user can not set this to empty. Also, if set to Yes, you will need to provide a ‘Default Value’
· Default Value: Any time a Requirement is created; this is the default value for this attribute.
· Drop Down Options: Only required if the attribute type is ‘Drop Down’. This is a comma separated list and will appear as individual values in the Drop Down.
· Changes to this Attribute …
o This is one of the powerful features of TraceCloud. Every Requirement has a version. Its starts with Version 1 and keeps on going up based on changes to this Requirement.
o Also a Requirement has traces (relationships) to other Requirements. EG : REL1ß BR-1, BR-2 or BR-1ßFR-1. And any time one Requirement changes, then the relationships between that and its related Requirement are suspect, till both parties agree to the change.
o From an approval work flow perspective, when an approver approves a Requirement, he / she may be approving a set of information they are seeing.
o TraceCloud gives you the power to configure the project so that you control how the changes to an attribute impact the Version, Traceability and Approval behavior.
o By default, if a Requirement Name or Description changes, the following events will occur
§ The Requirement version number goes up by 1
§ All the traces to and from this Requirement are set to suspect
§ The ‘Approval WorkFlow Status’ is set to ‘Draft’ , so that it can be resubmitted for approval
o In addition to that, you can configure the system so that a change to a custom attribute can impact the Version, Suspect and Approval Workflow Status
o If you want change this attribute to increase the version of this Requirement by 1, set ‘Upgrades Requirement Version’ to ‘yes’
o If you want change this attribute cause all Trace to and from this Requirement to go ‘Suspect’ then , set ‘Causes Suspect Traces’ to ‘yes’
o If you want change this attribute to change the Approval Work Flow status of this Requirement to ‘Draft’ , i.e. reset it, then, set ‘Resets Approval Workflow to Draft’ to ‘yes’
Edit a Custom Attribute
To Edit a Custom Attribute, Log into the project, click on ‘Administer’ link, click on the ‘Requirement Type’ in the panel on the left, select the Attribute from the list on the right and edit the settings. For the definition and impact of each field in this screen, please refer to the image in the ‘Create a Custom Attribute’ section.
Note : As you change the settings, it will impact not only any future Requirements you may create, but also the existing Requirements.
Delete a Custom Attribute
To Delete a Custom Attribute, Log into the project, click on ‘Administer’ link, click on the ‘Requirement Type’ in the panel on the left, select the Attribute from the list on the right and edit the settings. For the definition and impact of each field in this screen, please refer to the image in the ‘Create a Custom Attribute’ section.
Note : As you delete the attribute, the system will go through all the existing Requirements and remove this attribute from them.
Baseline
Baselining is a powerful concept in TraceCloud. We have taken the regular definition of Baseline (snapshot an object at a point in time) and significantly expanded on it. At TraceCloud, we define a Baseline as an ‘A Snapshot of a logical grouping of Requirements’.
One example we like to give is as follows : Let’s say, you and a friends took group photographs as you were growing up. Now, if you take a look at these photographs, you can get the following information :
· Which individuals were in a particular photo
· What did the look like, what did they wear, how tall / fat / thin they were when the photo graph was taken
· As times progressed, how did your ‘collection of friends’ change
· How did these individuals grow up over time i.e. what do they wear now, how tall / fat / thin are they now
· How are they performing in life
Now apply the same concept to Requirements. With TraceCloud you have the ability to define Baselines and add Requirements to these Baselines. Let’s say, you have a project with 1000s of Requirements and you have 2 critical customers. IBM and HP. As the project progressed, you created 4 baselines. IBM 2009, HP2009, IBM 2010, HP2010. Using TraceCloud, you can now get the following information
· What were the Requirements you promised to IBM in 2009
· Even the Requirements in the project may have changed over time, what was the actual text / date of the promised Requirements to IBM in 2009
· As time has progressed, what is the change in these Requirements. I.e. Flux since promised.
· What’s the similarity / difference between the Requirements promised to HP and IBM in 2009
· What are the number of critical parameters like ‘Approval’, ‘Dangling’, ‘Orphan’, ‘Testing Status’, ‘Defects’, ‘Completion’ telling me.
· Can I locate the Requirements in the ‘IBM 2009’ baseline that have the following condition
o ‘Approval=Rejected’,
o ‘Dangling=True’,
o ‘Orphan = False’,
o ‘Testing Status=Fail’,
o ‘Defects > 0’,
o ‘Completion < 100%’
TraceCloud easily lets you answer all the above questions . It goes one step further and leverages ‘Baselines’ in ‘Shared Requirements’. Using ‘Shared Requirements’, you can collect a common set of best practices, iterate through the review / approval process, and once they are mature, add them to a stable baseline and publish this baseline. Then other projects can search, locate, filter and import these common requirement sets.
Use Case1 : You have 20 projects from the same client and the client has imposed some look / feel / billing / security requirements on all these projects , and you would like to drive quality / compliance to client needs across all your projects
Use Case2 : You are building 10 phones and all these phones use the common OS , FCC , Disability guidelines, and would like publish the OS, FCC and Disability Requirements and import them into each phone.
Use Case 3 : You are building a product and this product is used in 20 solutions, and would like the product Functional specs tested in each of the 20 solutions.
For more on this topic, please see the documentation on Shared Requirements.
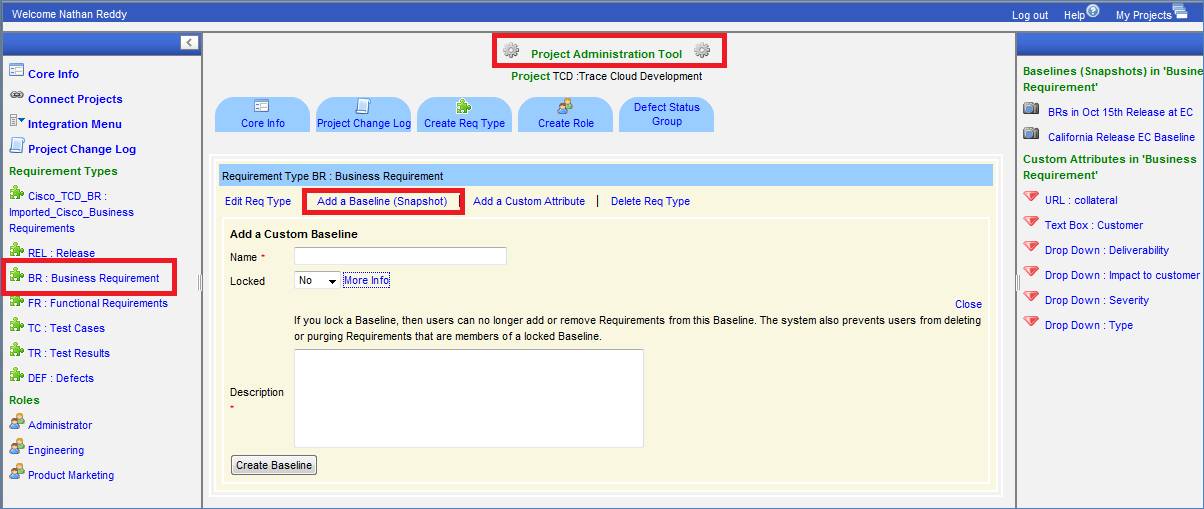
Create a Baseline
To Create a Baseline, log in to your project, click on the ‘Administer’ link to go to your ‘Administration Tool’, select your Requirement Type on the left hand panel and then click on ‘Create a Baseline’ link.
A Baseline can be locked or unlocked. If it’s ‘Unlocked’, then it means users can add / remove Requirements to / from this baseline (similar to ‘Framing a shot’ when taking a picture). If the Baseline is ‘Locked’, then users can not add / remove requirements to / from this baseline and also they cannot ‘Delete’ or ‘Purge’ requirements in this Baseline. To ‘Delete’ or ‘Purge’ requirements in any Baseline, you will have to ‘Unlock’ the baseline and remove the Requirement from the Baseline and then delete it.
Edit a Baseline
To Edit a Baseline, log in to your project, click on the ‘Administer’ link to go to your ‘Administration Tool’, Select your Requirement Type on the left hand panel . This will populate the Requirement Type on the screen and on the right hand side, you will see a list of Baselines that have been created for the Requirement Type. Click on the one you are trying to edit.

Delete a Baseline
To Delete a Baseline , just follow the same steps as ‘Edit a Baseline’, just click on ‘Delete Baseline’ button instead of ‘Update Baseline’
Note: If you delete a Baseline , the
association of Requirements to this Baseline will be removed.
Please note that this does not impact the Requirements
themselves, it just de-links those Requirements from this Baseline.
Roles
Roles are a convenient way of organizing your users into functional groups and managing their security permission. Every TraceCloud projects gets created with ‘Administrator’ and ‘User’ roles and the person creating the project is an ‘Administrator’.
Notes :
· Please make sure that you have at least 2 people listed as Administrators .
· If you have no administrators, then you cannot administer your project. (Sounds simple, but we have had some instances where TraceCloud support had to get involved to restore access )
· You cannot ‘Delete’ the ‘Administrator’ role.
· You can create as many Roles as you want
· A user can belong to more than one Role, and his / her permissions are a super set (union) of all the permissions these Roles have.
Create a Role
To create a role, log in to your project, click on ‘Administer’ and once in the ‘Project Administration Tool’, click on the ‘Create a Role’ tab.

Access Control in TraceCloud
TraceCloud has a highly granular ‘Access Control’ and using Roles , you can mix and match these access controls to a user’s job profile.
Notes :
· All Requirements in TraceCloud exist in some folder or other. A ‘Folder’ is a logical bucket to store your Requirements
· Every Requirement Type gets a root level folder, which has lots of user created sub folders.
· At a folder level, you can define what actions a member of role can perform.
· These actions are ‘Create’, ‘Read’, ‘Update’, ‘Delete’, ‘Trace’, ‘Approve’
o To Create Requirements in a folder, a user has to belong to a role with ‘Create’ permissions on that folder
o To Read Requirements in a folder, a user has to belong to a role with ‘Read’ permissions on that folder
o To Update Requirements in a folder, a user has to belong to a role with ‘Update’ permissions on that folder
o To Delete or Purge Requirements in a folder, a user has to belong to a role with ‘Delete’ permissions on that folder
o To Trace to Requirements in a folder, a user has to belong to a role with ‘Trace’ permissions on that folder. So if a Business Requirement (BR-1) is in a folder called ‘High level BRs’, and a Functional spec (FS-236) is in a folder called ‘Engineering Response’, then a user trying to create/ remove a trace between BR-1ßFS-236, has belong to a role with ‘Trace’ permission on both ‘High level BR’ folder and ‘Engineering Response’ folder. Note that whether the user can read / edit / create / delete these individual requirements are controlled by the Read, Update, Create, Delete permissions on individual folders, but to do Traceability, you need ‘Trace’ permission on both source and target folders
o To Approve Requirements in a folder, a user has to belong to a role with ‘Approve’ permissions on that folder
o All ‘Approvers’ on a folder are considered ‘Stake Holders’ on all Requirements in that folder and are kept notified of any significant changes to those Requirements.
· The take away is ‘Access Control’ in TraceCloud is the combination of ‘Roles’, ‘Folders’, ‘Permissions’ (Create, Read, Update, Delete, Trace, Approve).
· Access Control is applied to users , based on the Roles they are members of
· Access Control is a superset of all the privileges a user has. So , if a user is a member of ‘Limited Authority Users’, ‘Administrator / All powerful Demigod’ , then he / she gets the ‘All powerful’ permissions.
· In the screenshot below you will see that the Access Control is the intersection of ‘Role’, ‘Folder’, ‘Privilege’
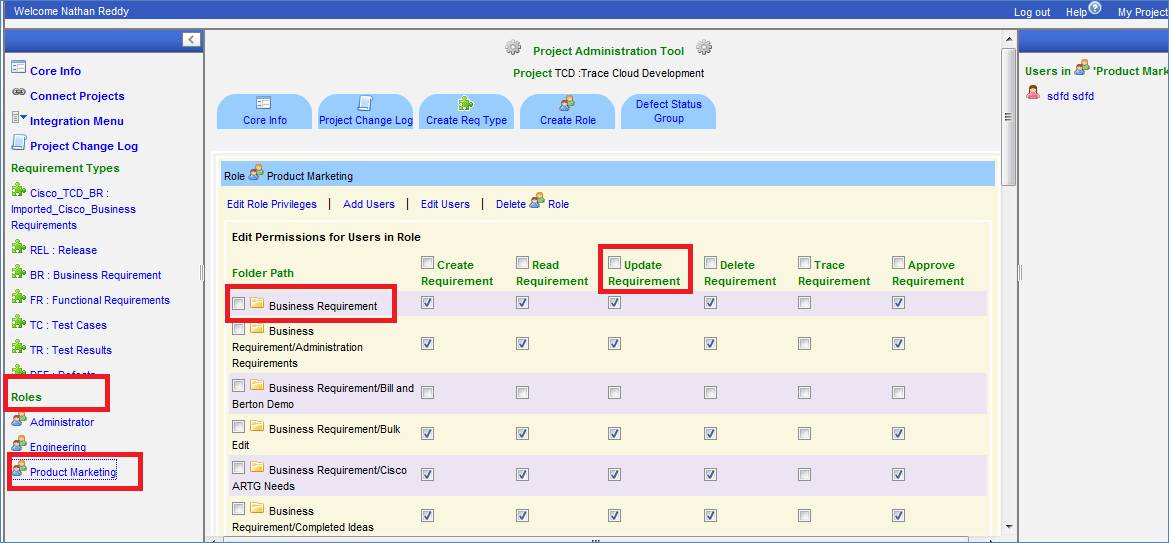
Edit a Role’s Privileges
To edit a Role’s privileges, log into a Project, click on the ‘Administer’ link to go to your ‘Administration Tool’, Select the ‘Role’ you want to edit on the left hand panel . This will populate the Role and its privileges. Use the check boxes to grant / revoke permissions.
Tip : To grant ALL privileges on a folder, to a Role, click on the check box at the beginning of the Row. In the screenshot above, the checkbox next to ‘Business Requirement’ will check all the boxes in the row.
Tip: To grant a privilege on ALL folders , to a Role, click on the check box, at the top of the column. In the screenshot above, the checkbox next to ‘Update Requirement’ will check all the boxes in the column.
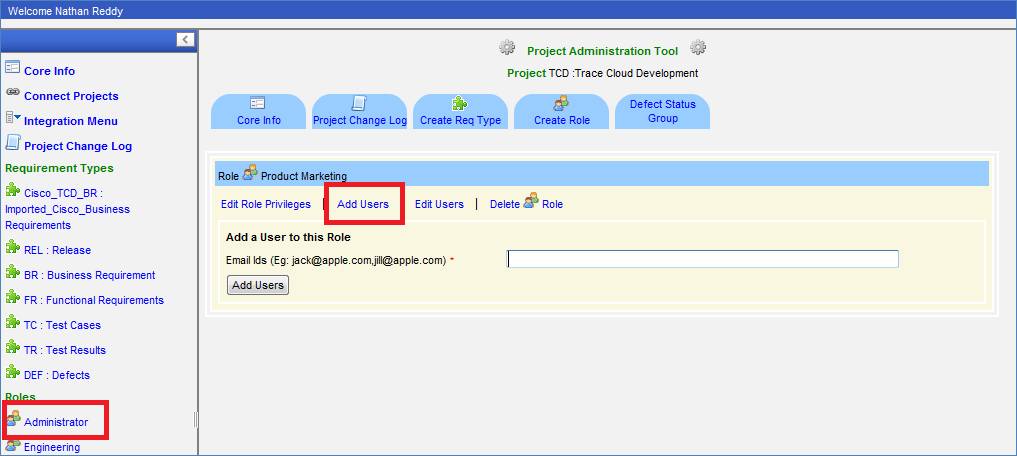
Add users to a Role
To add a user to a Role, go to the ‘Project Administration Tool’, select the Role and click on the ‘Add Users’ link. You can then enter a comma separated list of email id.
Note :
· If this project has ‘Restricted Domains’ set up, then only those users whose email Ids end in those domains, can be added to this project. Eg : if this a Cisco project and you want only Cisco employees to have access to this project, then you would set cisco.com as a Restricted Domain for this project. In this case only those users who have their email ids ending in cisco.com can be made members of this project.
· Once you add users, if they are already have an account on TraceCloud, the will be able to access this project immediately. (They may have to log out and log back in) . They will get an email notification of this permission grant
· If the newly added users do not have an account with TraceCloud, they will have access to TraceCloud as soon as they create an account at TraceCloud.
· All email notifications are sent every 3 hours, so please give a 3 hour window for your users to receive their invitations.
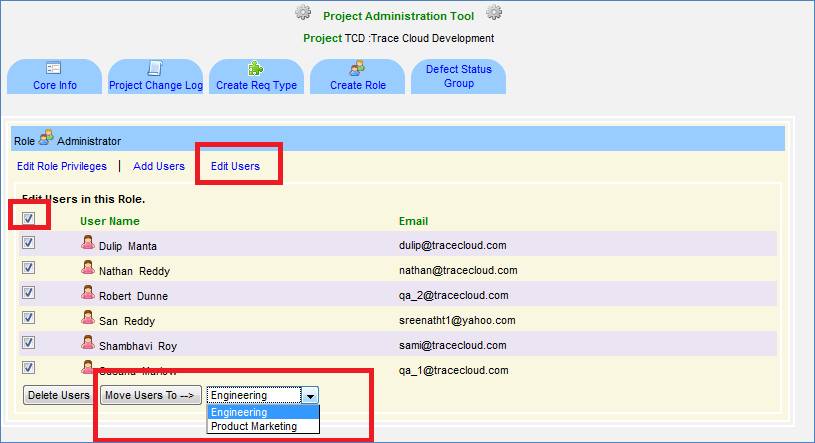
Move users to a Different Role
To move users to a different role, log into your project, go to the ‘Administration’ tool, select the Role, click on ‘Edit Users’ , select the users you want to move and click the button ‘Move Users To’, after selecting the target.
Delete users from a Role
To Delete a Role, log in to your project, go to the ‘Project Administration Tool’, select the Role and click on the ‘Delete role’ link. Note, that this will not ‘Delete’ the user accounts. It will simply remove the role and remove the access permissions of this role.
Miscellaneous
Edit Core Info
Every project has some core info that describes its name, description, owner, website , organization, tags etc… It also has ‘Restricted Domains’, which controls the type of users that can be members of this project. For example, if you belong to consulting firm ‘Fore10’ and have a project for client ‘IBM’, you can be certain that all the members of this project will have email ids ending in either force10.com or ibm.com. So you set the ‘Restricted Domains’ to ‘force10.com,ibm.com’.
Note : If you leave this field blank, then this restriction is not enforced.
To edit the project core info, log in to the project, go to the ‘Administration Tool’, and click on ‘core info’.

Delete a Project
If you ‘Delete’ a project, all the requirements, attributes, comments, images, documents, reports (Essentially everything in the project) will be permanently removed. This information can then not be recovered.
Note :
· Delete ‘Project’ does not remove user accounts
· Deleting a project PERMANENTLY removes all the information in the project
· Prior to ‘Deleting’ a project, please do a ‘Project Export’. You can do this by logging in to your project and clicking on a link named ‘Project Export’ at the top right of the screen
· Project Export is an excel output all requirement types, requirements, attributes etc about the project
· Please note that the project export does not export the images, files, reports etc..
· Project Delete also removes all the ‘TDCS’ documents in that project.
·
‘Deleting’ a project, Deletes everything in that project, and
it cannot be recovered
To Delete a project, go the ‘Project Administration Tool’, click on ‘Core Info’. At the bottom of the screen you will see a button for ‘Delete this Project’
Project Change Log
Every activity related to the project structure is captured in the ‘Project Change Log’. These are typically related to changes in Requirement Type, Attributes, Roles, Users, Access Control, Core Info, external projects etc… To get the change log, go to the ‘Administration Tool’, and click on the ‘Project Change Log’ link.
Defect Status Group
TraceCloud has in integrated Defect management system. To enable this , you need to have a Requirement Type called ‘Defect’ and it should have an attribute called ‘Defect Status’. This is a drop down and it can have as many statuses as your process dictates. Some common ones are ‘New’, ‘Assigned’,‘Junk’,’Resolved’,’Verified’,’Closed’. If your process dictates that you have few more ‘Defect Status’ , from a reporting purpose, you can map these numerous statuses in to a smaller pool.
Eg:
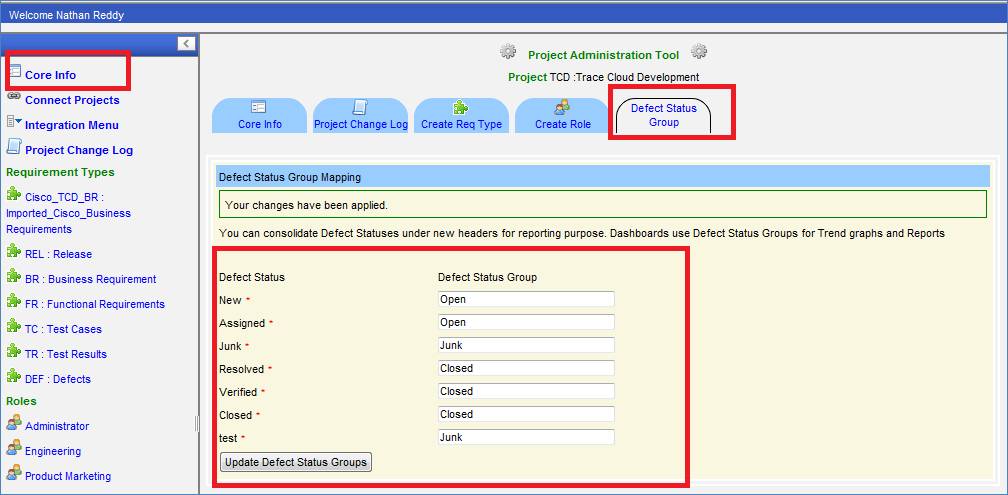
Once that is done, now your reports will start reflecting just the consolidated list and report bugs as ‘Open’, 'Junk’ and ‘Closed’. This will reflect itself in all the reporting systems.

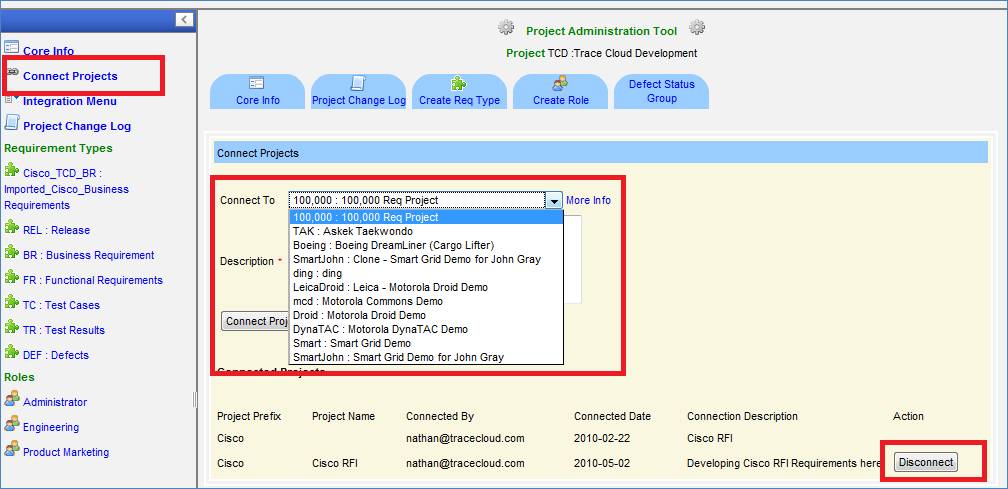
Connect Projects
TraceCloud lets you connect requirements from one project with requirements from another project. For example, if you have 2 projects (Project and Project) and you want trace some Functional Requirements in Project B to Business Requirements in Project A, you will first need to connect these two projects.
Notes :
· You have to be an Administrator in both project to connect the projects
· You have to have ‘Trace’ permissions on both source and target folders to be able to create a trace
· If you remove the ‘Connection’ between the two projects, the already created Traces will continue to exist
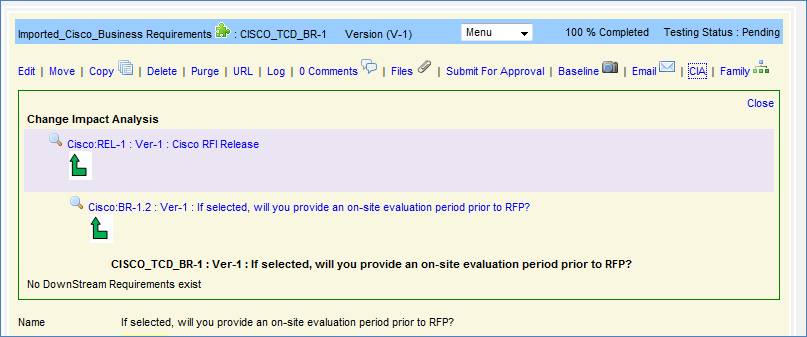
· Reports like ‘CIA’ (Change Impact Analysis), TraceTrees etc, will work across projects.
· TraceCloud has a security concept called REDACTING where, a TraceTrees will retain its structural integrity and show you the entire tree, but ONLY the Requirements that you have read access to will display the Requirement Text and attributes. If you don’t have read permissions on a Requirement, but it is still part of your CIA / TraceTrees report, the text will be redacted with ‘you donor have read permissions on this requirement’.
Once projects are connected, you can trace between them by using the projectprefix:req tag syntax. ‘ProjectA:Br-1’. See the screenshot below.
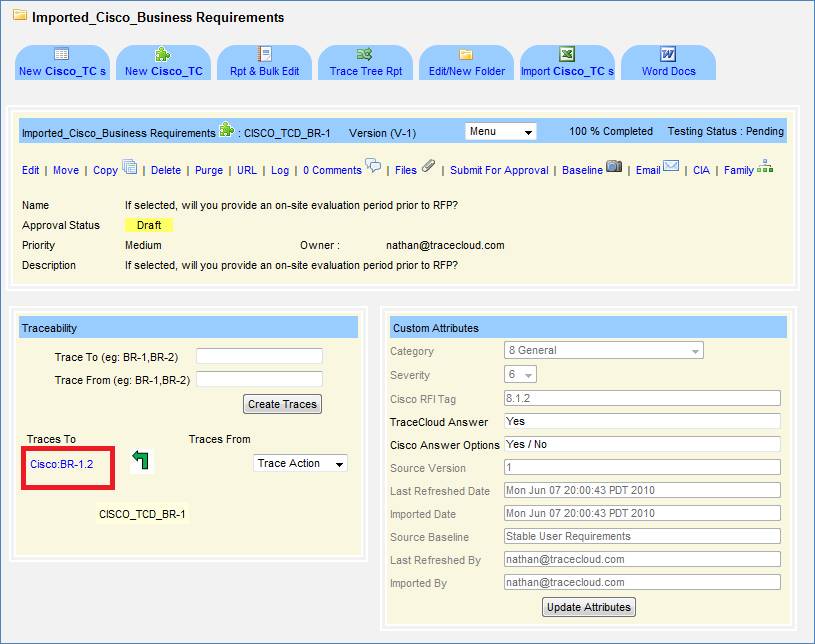
To see how CIA (Change Impact Analysis) works across projects, see the screenshot below. It shows how in Project ‘TCD’, there is a Business Requirement (CISCO_TCD_BR-1), that is connected to a Business Requirement in the second project and report the CIA across projects.
Integration Menu
There are times when you want Requirements (Business, Functional, Test, and Defect) in TraceCloud to integrate with external systems. TraceCloud provides an elegant MashUP for you to kick off these external systems from within TraceCloud. For example, you want to provide 2 links for your users to Create and Close a Defect in your Defect Management system. This is how you would do it.
In the Administration Tool, go to ‘Integration Menu’, specify your ‘Menu Labels’ and the target URLs for your defect management system. You may need to work with your IT department / owners of the ‘Defect Management’ tool to provide you the URL for this action.
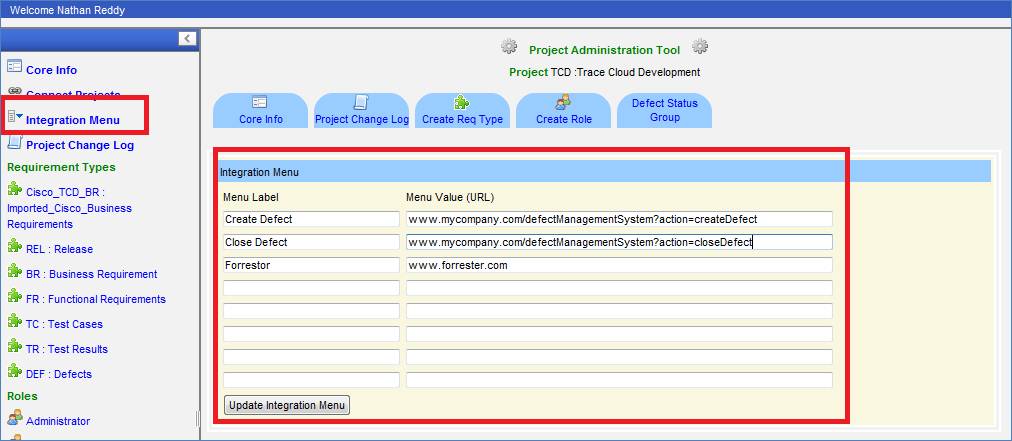
Once you set this up, you will notice a drop down menu in your Project’s Requirement screen.
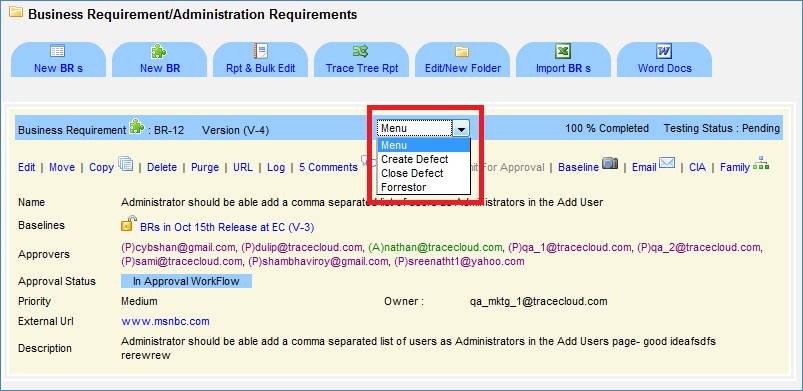
Every requirement in the system gets this menu and when a user clicks on any of the Menu options, he/she is redirected to the target location defined by you. What TraceCloud does is , it adds a lot of information about where the call is coming from to this URL.
www.mycompany.com/defectManagementSystem?action=closeDefect&requirementId=1527&folderId=121&projectId=19&projectShortName=TCD&user=nathan%40tracecloud.com&requirementFullTag=BR-12&requirementOwner=qa_mktg_@tracecloud.com&src=toolbar
Now the target application knows who made the call, what Requirement the person was in when he / she made the call and what he wanted done. At this point, the Target application can do what is required or if it needs it can use the TraceCloud’s web services API to call back get more information and then do the needful.
This Mash Up / Web Services API combination makes TraceCloud extremely powerful and easy to extend within the organization.
Special Terms / Objects
Some objects in TraceCloud have special meaning.
Release , Test Results, and Defects are special Requirement Types in TraceCloud and trigger special behavior. When you create a project , these Requirement Types are created by default. You can add additional attributes and use them like regular Requirement Types, but they have some wrapper functionality.
Release (REL) : To generate Release level dashboards, you need to have a Requirement type , whose prefix is ‘REL’.
Test Results : To activate ‘Testing Status’ behavior and roll up reporting, you will need to have a requirement type with prefix ‘TR’
Defects : To activate ‘Defect Status’ reporting and metrics, you will need a requirement type with a prefix ‘DEF’ and it should have a drop down attribute called ‘Defect Status’.